
Archives: October 2016
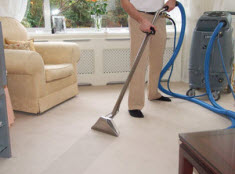
Most people when they try to clean their carpets themselves often make the same mistakes. Carpets need their own special care, and must be done using proper cleaning methods. Leading Carpet Cleaning will talk about those common mistakes people do when cleaning carpets. First you need the right equipment and proper cleaning materials. For cleaning carpets you will need a vacuum cleaner, steamer, and proper cleaning chemicals.
Should You Vacuum Before Steam Carpet Cleaning?
First mistake many people make is that they believe you just need to start steam cleaning your carpets. This is not so, you must thoroughly vacuum your carpets first. You must also use the proper vacuuming techniques; this doesn’t mean vacuuming in straight line. It may look nice but it doesn’t clean your carpets correctly. You should vacuum in many directions to suck up all the dirt and junk off your carpets.
Don’t Use Laundry Detergent that Will Leave Soap Residue on Your Carpets
Don’t use laundry detergent to clean your carpets. Carpets and clothing are very different. Use commercial carpet cleaners that are clearly labeled for carpets. There are number of natural cleaners that work great for carpets like vinegar, hydrogen peroxide, and baking soda. Each will assist in cleaning different stains and messes.
Follow Proper Patch Test Procedures
Never skip a patch test. A patch test is when you take your carpet cleaner and use it on a small area not easily seen. This will make sure the cleaner doesn’t lighten the carpet, or even damage the more sensitive carpet fibers. Never skip the carpet patch test before steaming cleaning your carpets or you can lighten and damage your entire carpet.
Don’t Over Wet Carpet When Cleaning
When you begin to steam clean your carpets never over soak them. Over wetting your carpet can discolor or lighten up the color as well. It is also known to shrink your carpet and tear itself away from the edge and floor. You will find it is difficult to suck up too much water and later cause mold and mildew underneath your carpet and the padding.
Don’t Scrub at Carpet Stains with a Colored Cloth
When trying to clean a stain or small area many people will get a stain remover along with a wet rag and scrub at the stain. Two major problems. One should never scrub at a stain. You should blot or pat a stain. Scrubbing pushes the stain deeper into the carpet fibers and spreads around and out. Two; a damp rag or cloth is fine but do not use hot or cold water. Use warm water instead. Never use a rag or cloth with color. Use a solid white cloth or rag. This way the dye from the rag doesn’t seep into your carpet creating another type of stain.
How Long After Carpet Cleaning to Put Furniture Back?
Most people are in a hurry to put the furniture back in place after you spent the time steam cleaning your carpets. Wet carpet can get damaged very easily. Dragging furniture and other heavy items rips and damages carpets. Even walking too much on wet carpets can cause the fibers to untwist and fray.
Professional Carpet Cleaning in Orange, Santa Ana, Rancho Cucamonga, Anaheim, Whittier, Riverside, Chino & Fullerton, California
Carpet cleaning isn’t as easy a task as many people believe it to be. There are many mistakes by those who have never learned how to properly clean carpets. We hope we have given you a few tips that will make the job easier and at the same time, preserve your carpet. We here at Leading Carpet Cleaning hope that we were able to aid you in your house cleaning duties. Contact us for all your floor and furniture cleaning needs.
Most people will take time to have their sheets washed, homes cleaned and wash their clothes without a second thought. When you ask about the last time they had their mattress cleaned they might not even know what you are talking about. Having your mattress cleaned is just as important as cleaning any other area in your home. There are not only the benefits of cleanliness but there are also health benefits as well.
Leading Carpet Cleaning Has Some Benefits to Having Your Mattress Cleaned By a Professional
Health Benefits Of Professional Mattress Cleaning: There is quite a lot of dirt and more that is found in a mattress on any given day. The mattress can be home to dust mites, dirt, sweat, flaked off skin and that can cause the mattress to agitate allergies. When allergies are agitated the person that suffers will not feel their best and can suffer from sneezing, coughing and more. That also leads to the person that has allergies to miss out on much needed sleep. The mattress can be cleaned by a professional and can remove a lot of the debris and dirt that is causing all the trouble.
Improves Indoor Air Quality: The air quality in your home is not going to be good naturally. There are many things that you have to do to get good air quality. Some of those things is to replace the air filter in the HVAC system on a regular basis. You also want to dust and clean the home often to remove the dust and particles that are floating around. Carpet and upholstery cleaning is another way to help remove some of the set in pet dander, hair and dirt that could be causing the air quality to diminish. Another area that many people overlook is cleaning the mattress professionally. The mattress is home to many types of dirt and debris and when the mattress is agitated such as when you sleep or make the bed you are sending all that debris into the air! This can lead to the air quality to drop drastically. Make sure that you have your mattress cleaned professionally on a regular basis as well.
Increase The Hygiene In Your Room: One way to help get a good nights sleep is to be sure that your mattress is clean. Just like when you have a fresh set of sheets that are straight from the washing machine it is a great night sleep. The sheets only going to stop so much of the debris you cant overlook the amount of dust mites and skin flakes that are all over the bed. It can also have other body fluids such as sweat that can weigh down the mattress and make it feel less comfortable and that can then lead to a bad night of sleep.
Mattresses Can Last Longer: The mattress should be replaced as often as the manufacturer recommends. That is if you are caring for your mattress and cleaning it regularly. If you choose to clean the mattress professionally you can extend the life of the mattress and that can end up saving you money.
Carpet & Mattress Cleaning, Stain & Odor Removal & More in Orange, Santa Ana, Rancho Cucamonga, Anaheim, Whittier, Riverside, Chino & Fullerton, California.
Leading Carpet Cleaning offers expert cleaning and restoration services. Call us to schedule your next appointment.
For anyone who is currently going through the crisis of having your beloved canine undergoing the effects of the Parvo Virus, this is a stressful time. The symptoms of Parvo are loss of appetite, lethargy, vomiting, and diarrhea. Those unfortunate symptoms can leave a mess all over your home. Leading Carpet Cleaning will help your get rid of those stains and disinfect.
What Happen When Your Puppies or Dogs Have Parvo
Once your dog is diagnosed with Parvo, it will likely require hospitalization for several days. This can be a life threatening virus that is extremely contagious. Researchers know that the Parvo virus is spread through an infected canine’s feces, and some believe their saliva too. If you dog recovers, you will have to clean and disinfect your entire home and yard or your dog will get this terrible virus again. The soiled area should be your main point of focus. However wherever the dog even touched must also be disinfected. For hard surface areas and even the yards you can use bleach. You can use diluted bleach and water about 1 to 10 dilution. However if the dog vomited or had diarrhea on the carpets, spraying bleach isn’t an option. Cleaning diarrhea from carpet can be difficult as the virus soaks deep into the carpet fibers. Another problem when battling diarrhea stains from the Parvo virus is that their may be blood mixed in with the diarrhea.
Parvo Carpet Cleaning & Disinfecting Protocol
Cleaning the stains isn’t just for your home aesthetics. It’s also to remove the virus so your recovered canine doesn’t get this deadly virus again or any other canine if present. To begin we suggest you use a steamer cleaner to disinfect the carpets. With the steamer, use straight hot water and clean the entire carpeted area. This will help you get much of the stain (diarrhea and vomit) from off the surface of the carpet. Next spray a pet stain remover directly on the affected areas. Sometimes you may not have much luck with typical commercial grade pet stain removers. This is due to the blood mixed in with the diarrhea. You may want to try to use a mixture of hydrogen peroxide and baking soda. This lifts the blood quite effectively. After you have applied the stain remover of choice, use the steamer with just hot water again to clean the stain. After the stains have been dealt with, it is time to disinfect. If available fill a pressure sprayer with a pet-safe disinfectant labeled as approved by the Environmental Protection Agency (EPA) to kill parvovirus. Follow the disinfectant manufacturer’s instructions to determine the proper amount of disinfectant to use. Keep in mind, some disinfectants needs to be diluted with water. Spray the wet carpet thoroughly with the disinfectant. Making sure to thoroughly saturate the carpet through to the padding. Leave the disinfectant on the carpet for a minimum of 10 minutes or otherwise directed. Next, fill the steamer with the disinfectant. Depending on the brand, it may need to be diluted or undiluted. See the directions to know which. Then steam clean your carpets. Make sure to go over the entire area to make sure the entire virus has been killed. For extra thoroughness you can rewash carpets with just hot water.
Carpet Cleaning, Stain & Odor Removal in Orange, Santa Ana, Rancho Cucamonga, Anaheim, Whittier, Riverside, Chino & Fullerton California
It’s never easy to see our beloved pets suffer. We at Leading Carpet Cleaning want to help clean your home of the stains, virus and bad memories. We hope this will help prepare your home to receive your beloved canine friend and that he or she had a speed recovery. Contact us for all your floor and upholstery cleaning and restoration needs.
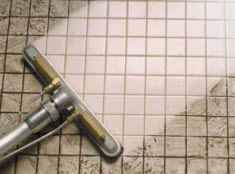
You are so excited; you just picked out the tile for your home and are done making that big decision. Oh wait, you have to choose grout? There are different colors and types? Making all of these decisions can be taxing. When you are choosing the right grout for your tile floors, you will find there are many different options to choose from. Leading Carpet Cleaning is here to talk about some of the options you have to consider when choosing the right grout for your home.
Choose the Best Type of Grout for Your Floors & Showers etc
When choosing the right grout for your home, you need to consider where you will be putting it. There are a few different options to think about for different areas in your home.
Unsanded or Sanded Grout Options
There are times you will want to use grout that has sand mixed in it. There are also times that it is more beneficial to have no sand mixed in. Sand helps your grout withstand cracking and/or shrinking. If you are going to have grout joints that are wider than 1/8 inch, you will definitely want to use a sanded grout to avoid any cracking issues. If the grout joints are less than 1/8 inch wide, you would benefit from unsanded grout.
Cement or Epoxy Grout Choices
A popular choice in grouting, is cement based grout. It is the most cost efficient and as a general rule, is more available than epoxy based grout. Epoxy and Furan grout is harder to install and comes with a bigger price tag as well. There are benefits to using epoxy grout though. You will find that it is very resistant to stains. It is also a more durable option. It is found to withstand any damage caused by household cleaners or water damage. Epoxy grout is a great choice for wall tiles and glass tiles.
How to Pick the Right Grout Color
Just like when you choose a paint color, grout colors come in samples so you can take them home and see what they look like next to your tile and in your home. If you are wanting to showcase the pattern used in your tile, you may want a contrasting grout color. This will draw attention to the tile pattern more than other options. If you choose a grout color that matches your tile, it will help the grout lines be less pronounced and attention will be drawn to the tiles. Choosing neutral colors when it comes to grout is always a safe option. You can mix and match many tile designs with neutral grout colors such as grey, tan, or brown.
Is Dark Better Grout Better than Light for Gray & Other Color Tiles?
Both dark and light grout colors have benefits. When dealing with light colored grout, you may notice dirt more. When cleaning light colors, you don’t have to worry about fading the grout with harsh cleaners that are often used on flooring. Dark colored grout is great for hiding dirt and grime. This is another reason that neutral colors are a such a great option. When you choose a grout color that is neither light or dark, but somewhere in between, you get the best of both worlds. Grey, tan, and beige are all great options that will be easy to maintain.
Tile & Grout Cleaning in Orange, Santa Ana, Rancho Cucamonga, Anaheim, Whittier, Riverside, Chino & Fullerton California
It is important to properly maintain your tile flooring and other tiled surfaces. You spent a lot of time and money picking just the right tile and grout for your home, and you want to protect that investment. Having your tile floors professionally cleaned at least once a year will help extend the life of your tile flooring and keep them looking like they did they day they were installed. Leading Carpet Cleaning offers tile and grout cleaning, call for an appointment today!
Installing hardwood will add warmth and style to your home not to mention added value. When you’re shopping around for hardwood, it’s a good idea to consider whether or not the one you want is backed by a warranty. You will need to ensure that the subfloor you are installing over is level and you should also allow the boxes of hardwood flooring to sit in the room they are to be installed in for acclimation. There are three different common methods of hardwood flooring installation; nailed down, glued down and floating floors. Leading Carpet Cleaning consider the nailed down installation method.
Nailed Down Hardwood Floor Installation
When you’re ready to install the first row, make sure you choose the straightest planks you can find. The tongue side will need to face the center of the room. There is an expansion gap that you will need to place spacers inside of. The expansion gap is the space between the wall and the floor that will allow for expansion of the hardwood that will result from heat and humidity. Next you need to pre-drill holes ¼ inch from the narrow side of the plank at ½ an inch away from the wall and you’ll need to continue at 6-inch intervals for each board. To make sure your finished product has a blended color and won’t have areas that look patchy you need to take boards from different boxes in your order. A pneumatic nailer is hard to use near a wall so you’ll need to use a regular hammer for the first few boards when you’re setting them in place. Drive the nails in a little deeper than the level of the hardwood (countersink) and fill the holes in afterwards with matching putty. Blind-nailing is a method used to hide a nail using the next board to hide it once it’s installed. You always need to countersink the nail driving it a little lower than the surface of the wood to prevent interference in the joint connection of the next board. Once the first row is completed, you can lock the tongue and groove and tap them together with a rubber mallet and a block to ensure a tight fit between the boards. You should also stagger the ends of boards six inches in between adjoining boards to create a stronger and more eye catching flooring pattern. You will now go ahead and blind nail the second row along the tongue and repeat the process. When you get to a certain point you can start using the flooring nailer. To use this tool, you’ll need space and will usually happen when you get to row three of four. There is a boot that you attach to the nailer to protect the floor as you’re working at installing it. It’s very important to keep the expansion gap you created along the first wall all around the room. As you approach the last rows you will need to start nailing the boards by hand as space will get tight again. Countersink the nails and use putty to fill the holes. Now that it’s all finished you can install the transition pieces, remove the spacers attach the baseboards to the wall and stand back and admire your work!
Hardwood Flooring Installation in Orange, Santa Ana, Rancho Cucamonga, Anaheim, Whittier, Riverside, Chino & Fullerton California
If you’re confident in your DIY skills, you can install your own hardwood floors but if you would rather have the professionals take care of it for you, give leading Carpet Cleaning a call!
Archives
- March 2024
- September 2018
- August 2018
- July 2018
- June 2018
- May 2018
- April 2018
- March 2018
- February 2018
- January 2018
- December 2017
- November 2017
- October 2017
- September 2017
- August 2017
- July 2017
- June 2017
- May 2017
- April 2017
- March 2017
- February 2017
- January 2017
- December 2016
- November 2016
- October 2016
- September 2016
- August 2016
- July 2016
- June 2016
- May 2016
- April 2016
- March 2016
- February 2016
- January 2016
- December 2015
- November 2015
- October 2015
- September 2015